

How To Install Java Eclipse On Windows 10
Eclipse for Java
How To Install Eclipse and Get Started with Coffee Programming
(on Windows, macOS and Ubuntu)
Eclipse (@ www.eclipse.org) is a free and open-source Java Integrated Development Environment (IDE), originated from IBM inspired by VisualAge (in 2001), and at present maintained by Eclipse Foundation. Eclipse is a desktop app written mostly in Java. Nonetheless, information technology uses its own Java graphics library known as SWT (Standard Widget Toolkit), instead of Java's Swing/AWT.
Eclipse is popular for Java application development (Java SE and Java EE) and Android apps. It too supports C/C++, PHP, Python, Perl, and other web project developments via extensible plug-ins. Eclipse is cross-platform and runs under Windows, Linux and macOS.
Eclipse Versions
The various versions are:
- Eclipse 1.0 (November 7, 2001): based on an earlier Java IDE called VisualAge from IBM.
- Eclipse 2.0 (June 28, 2002)
- Eclipse 2.1 (March 28, 2003)
- Eclipse three.0 (June 25, 2004)
- Eclipse 3.1 (June 28, 2005)
- Eclipse iii.2 (June 30, 2006) (Callisto - named after one of the Jupiter's Galilean moons): started almanac simultaneous release of all the related Eclipse projects.
- Eclipse three.3 (June 25, 2007) (Europa - named later on another Jupiter's Galilean moons)
- Eclipse three.iv (June 19, 2008) (Ganymede - named after yet another Jupiter's Galilean moons)
- Eclipse iii.5 (June 12, 2009) (Galileo - named after the dandy 17th century scientist and astronomer Galileo Galilei)
- Eclipse iii.vi (June 23, 2010) (Helios - named after god of the sun in Greek Mythology)
- Eclipse iii.seven (June 23, 2011) (Indigo)
- Eclipse 4.2 (June 27, 2012) (Juno)
- Eclipse four.three (June 2013) (Kepler)
- Eclipse 4.4 (June 2014) (Luna)
- Eclipse 4.5 (June 2015) (Mars)
- Eclipse iv.6 (June 2016) (Neon)
- Eclipse four.7 (June 2017) (Oxygen)
- Eclipse four.8 (June 2018) (Photon)
- Eclipse 2018-09 (four.9) (starting quarterly release), Eclipse 2018-12 (4.10)
- Eclipse 2019-03 (4.eleven), Eclipse 2019-06 (four.12), Eclipse 2019-09 (four.13), Eclipse 2019-12 (four.14)
- Eclipse 2020-03 (4.15), Eclipse 2020-06 (4.16), Eclipse 2020-09 (4.17), Eclipse 2020-12 (iv.18)
- Eclipse 2021-03 (4.nineteen), Eclipse 2021-06 (four.20), Eclipse 2010-09 (4.21), Eclipse 2021-12 (four.22)
- Eclipse 2022-03 (4.23)
How to Install Eclipse IDE 202x-xx for Java Developers
How to Install Eclipse on Windows
Step 0: Install JDK
To utilise Eclipse for Java programming, you need to starting time install Coffee Evolution Kit (JDK). Read "How to Install JDK for Windows".
Stride ane: Download
Download Eclipse from https://www.eclipse.org/downloads/packages/. Choose "Eclipse IDE for Coffee Developers" and "Windows x86_64" (e.g., "eclipse-java-202x-twenty-R-win32-x86_64.null" - about 313MB) ⇒ Download.
Pace 2: Unzip
To install Eclipse, simply unzip the downloaded file into a directory of your choice (e.yard., "c:\myProject").
I prefer the zip version, because there is no need to run any installer. Moreover, you lot tin can simply delete the entire Eclipse directory when it is no longer needed (without running any un-installer). You are free to move or rename the directory. You can install (unzip) multiple copies of Eclipse in the same machine.
How to Install Eclipse on macOS
To use Eclipse for Java programming, you lot need to beginning install JDK. Read "How to install JDK for macOS".
To install Eclipse:
- Goto http://world wide web.eclipse.org/downloads/bundle/. Choose "Eclipse IDE for Java Developers" and "macOS x86_64" (for Intel processor). Y'all will receive a DMG file (e.g., "
eclipse-java-202x-xx-R-macosx-cocoa-x86_64.dmg"). - Double-click the downloaded Disk Image (DMG) file. Follow the screen instructions to install Eclipse. Eclipse will be installed under "
/Applications/eclipse". (To ostend!)
How to Install Eclipse on Ubuntu Linux
Eclipse comes with many flavors (See "Eclipse Packages" @ https://www.eclipse.org/downloads/compare.php):
- To use Eclipse for Coffee programming, choose "Eclipse IDE for Java Developers" (JavaSE) or "Eclipse IDE for Java EE Developers" (JavaEE). You demand to beginning install JDK. Read "How to install JDK on Ubuntu".
- To employ Eclipse for PHP programming, choose "Eclipse IDE for PHP Developers".
- To apply Eclipse for C/C++ programming, choose "Eclipse IDE for C/C++ Developers".
Nonetheless, you lot can install any package, and so add more features when needed.
To install Eclipse (e.k, for Java Programming):
- Download Eclipse from http://world wide web.eclipse.org/downloads/. Under "Get Eclipse IDE 202x-xx" ⇒ Click the link "Download Packages" (instead of pushing the button "Download x86_64"). Cull "Eclipse IDE for Java Developers" for Coffee SE program development; or "Eclipse IDE for Java EE Developers" for developing webapps ⇒ Linux x86_64. You volition receive a tarball (e.thousand., "
eclipse-java-202x-20-R-linux-gtk-x86_64.tar.gz") in the "~/Downloads" folder. - We shall install Eclipse under
/usr/local.$ cd /usr/local $ sudo tar xzvf ~/Downloads/eclipse-java-202x-xx-R-linux-gtk-x86_64.tar.gz $ cd /usr/bin $ sudo ln -due south /usr/local/eclipse/eclipse $ ls -ld /usr/bin/eclipse lrwxrwxrwx i root root 26 Aug 30 11:53 /usr/bin/eclipse -> /usr/local/eclipse/eclipse $ which eclipse /usr/bin/eclipse
To run Eclipse, open the "/usr/local/eclipse" folder and click on the "Eclipse" icon; or showtime a "Terminal", enter "eclipse".
Lock Eclipse on Launcher
Simply commencement Eclipse. Correct-click the Eclipse icon ⇒ "Lock to Launcher" or "Add to Favourite".
(For older version - If the in a higher place don't work) Create a /usr/share/applications/eclipse.desktop file with the following contents:
[Desktop Entry] Proper noun=Eclipse Type=Awarding Exec=eclipse Final=false Icon=/usr/local/eclipse/icon.xpm Comment=Integrated Development Environment NoDisplay=simulated Categories=Development;IDE; Proper noun[en]=Eclipse
Showtime Eclipse, right-click on the Eclipse icon on launcher ⇒ "Lock to launcher".
Writing your First Java Program in Eclipse
Step 0: Launch Eclipse
- Launch Eclipse past running "
eclipse.exe" from the Eclipse installed directory. - Choose an advisable directory for your workspace, i.e., the directory (or binder) that you lot would like to save your files (e.g.,
c:\myProject\eclipse_workspacefor Windows) ⇒ Launch. - If the "Welcome" screen shows upward, close information technology by clicking the "close" push next to the "Welcome" championship.
Step one: Create a new "Coffee Project"
For each Java awarding, you need to create a project to keep all the source files, classes and relevant resource.
To create a new "Coffee project":
- Choose "File" menu ⇒ "New" ⇒ "Java project" (or "File" ⇒ "New" ⇒ "Project" ⇒ "Coffee projection").
- The "New Coffee Project" dialog pops up.
- In "Projection name", enter "
FirstProject". - Check "Use default location".
- In "JRE", select "Use an execution surroundings JRE (JavaSE-twenty). Brand certain that your JDK is 11 and to a higher place.
- In "Project Layout", cheque "Use projection folder as root for sources and class files".
- In "Module", UNCHECK "Create module-info.java" file.
- In "Projection name", enter "
- IF "Create module-info.coffee" dialog appears, Click "Don't Create" (This will not appear if you do step 2(e)).
Step 2: Write a Hello-world Java Programme (or "Java Class")
- In the "Package Explorer" (left pane) ⇒ Right-click on "
FirstProject" (or apply the "File" carte) ⇒ New ⇒ Course. - The "New Java Grade" dialog pops up.
- In "Source folder", go on the "FirstProject".
- In "Parcel", leave it EMPTY . Delete the content if it is not empty.
- In "Proper name", enter "
Hello". - Cheque "
public static void main(Cord[] args)". - Don't change the balance.
- The source file "
Hello.coffee" opens on the editor panel (the center pane). Enter the following codes:public class Hi { public static void master(Cord[] args) { Organization.out.println("hello, world"); } }
Step 3: Compile & Execute the Java Program
- At that place is no need to compile the Java source file in Eclipse explicitly. Information technology is because Eclipse performs the so-chosen incremental compilation, i.e., the Java argument is compiled every bit and when it is entered.
- To run the plan, right-click anywhere on the source file "
Hi.java" (or choose "Run" card) ⇒ Run Every bit ⇒ Coffee Awarding. - The output "Howdy, earth!" appears on the Console pane (the lesser pane).
NOTES:
- Y'all should create a NEW Java "project" for EACH of your Java application.
- Nonetheless, Eclipse allows you to keep more than one programs (classes) in a project, which is handy for writing toy programs (such as your tutorial exercises - yous can continue many exercises in i project). To run a particular program, open and correct-click on the source file ⇒ Run Every bit ⇒ Java Application.
- Clicking the "Run" button (with a "Play" icon) runs the recently-run plan (based on the previous configuration). Try clicking on the "down-pointer" besides the "Run" button.
Correcting Syntax Errors
Eclipse performs incremented compilation, as and when a source "line" is entered. Information technology marked a source line having syntax mistake with a RED CROSS. Identify your cursor at the Scarlet CROSS to view the error bulletin.
You CANNOT RUN the plan if there is whatever syntax error (marked past a RED Cantankerous before the filename). Correct all the syntax errors; and RUN the plan.
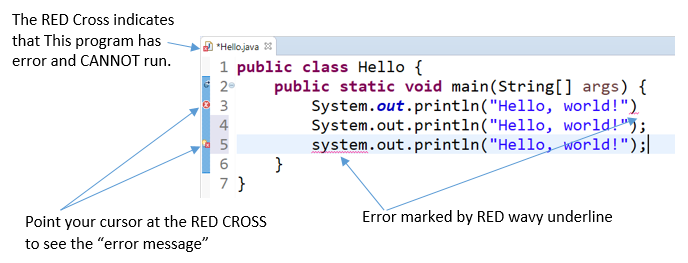
HINTS: In some cases, Eclipse shows a ORANGE Lite-Bulb (for HINTS) next to the ERROR RED-Cantankerous (Line five in the above diagram). You can click on the Light-BULB to get a listing of HINTS to resolve this particular error, which may or may not work!
SYNTAX WARNING: marked by a orange triangular exclaimation sign. Different errors, warnings may or may not cause problems. Endeavour to fix these warnings besides. Only you can RUN your program with warnings.
JDK's Javadoc
Yous can read the Javadoc of a method, by placing the mouse cursor over the method.
Read the Eclipse Documentation
At a minimum, you SHOULD browse through Eclipse'due south "Workbench User Guide" and "Coffee Development User Guide" - accessible via the Eclipse'southward "Welcome" page or "Assistance" menu. This will salve you many disturbing hours trying to figure out how to exercise somethings later.
Debugging Programs in Eclipse
Able to utilise a graphics debugger to debug plan is crucial in programming. It could save you countless hours guessing on what went wrong.
Step 0: Write a Java Programme
The following programme computes and prints the factorial of n (=1*two*3*...*n ). The programme, however, has a logical error and produce a incorrect respond for n =20 ("The Factorial of twenty is -2102132736" - a negative number?!).
ane 2 3 iv v 6 7 8 9 ten eleven 12 13 14 15 16 | public class Factorial { public static void principal(String[] args) { int north = twenty; int factorial = 1; int i = 1; while (i <= n) { factorial = factorial * i; i++; } Arrangement.out.println("The Factorial of " + northward + " is " + factorial); } } |
Let's utilize the graphic debugger to debug the program.
Step i: Set an Initial Breakpoint
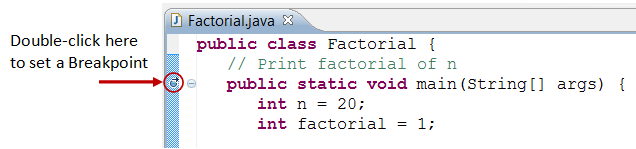
A breakpoint suspends program execution for you to examine the internal states (e.chiliad., value of variables) of the program. Before starting the debugger, yous demand to set at to the lowest degree one breakpoint to suspend the execution inside the program. Set up a breakpoint at chief() method by double-clicking on the left-margin of the line containing main(). A blue circle appears in the left-margin indicating a breakpoint is set at that line.
Step 2: Start Debugger
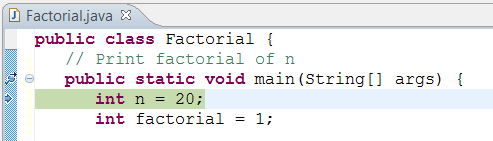
Right click anywhere on the source code (or from the "Run" bill of fare) ⇒ "Debug Every bit" ⇒ "Coffee Awarding" ⇒ choose "Yes" to switch into "Debug" perspective (A perspective is a particular organisation of panels to suits a certain development task such as editing or debugging). The program begins execution but suspends its performance at the breakpoint, i.east., the primary() method.
As illustrated in the post-obit diagram, the highlighted line (likewise pointed to by a blue arrow) indicates the argument to be executed in the next step.
Pace 3: Footstep-Over and Watch the Variables and Outputs
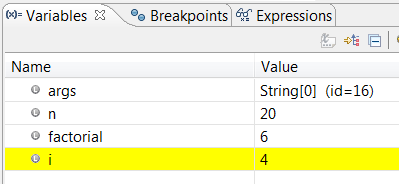
Click the "Stride Over" button (or select "Stride Over" from "Run" menu) to single-step thru your plan. At each of the stride, examine the value of the variables (in the "Variable" panel) and the outputs produced by your program (in the "Console" Panel), if any. You tin can also place your cursor at any variable to inspect the content of the variable.
Single-stepping thru the program and watching the values of internal variables and the outputs produced is the ultimate mean in debugging programs - considering information technology is exactly how the estimator runs your program!
Step iv: Breakpoint, Run-To-Line, Resume and End
Every bit mentioned, a breakpoint suspends program execution and let you examine the internal states of the program. To prepare a breakpoint on a particular statement, double-click the left-margin of that line (or select "Toggle Breakpoint" from "Run" menu).
"Resume" continues the plan execution, upward to the next breakpoint, or till the end of the programme.
"Single-step" thru a loop with a large count is time-consuming. You could set up a breakpoint at the argument immediately exterior the loop (due east.g., Line 11 of the above program), and upshot "Resume" to complete the loop.
Alternatively, you can place the cursor on a particular argument, and issue "Run-To-Line" from the "Run" menu to continue execution up to the line.
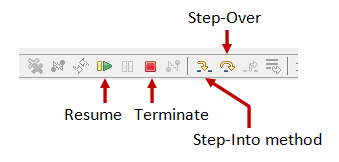
"Terminate" ends the debugging session. Always stop your current debugging session using "Stop" or "Resume" till the end of the plan.
Footstep 5: Switching Back to Java perspective
Click the "Java" perspective icon on the upper-right corner to switch back to the "Java" perspective for further programming (or "Window" menu ⇒ Open Perspective ⇒ Java).
Of import: I tin's stress more than that mastering the utilise of debugger is crucial in programming. Explore the features provided by the debuggers.
Other Debugger's Features
Footstep-Into and Step-Return: To debug a method, you demand to use "Pace-Into" to pace into the first statement of the method. ("Step-Over" runs the function in a unmarried step without stepping through the statements inside the office.) You could use "Step-Return" to return back to the caller, anywhere within the method. Alternatively, yous could set a breakpoint inside a method.
Modify the Value of a Variable: You can modify the value of a variable by entering a new value in the "Variable" panel. This is handy for temporarily modifying the behavior of a program, without changing the source code.
Tips & Tricks
Full general Usages (for all Programming Tasks)
These are the features that I find to be most useful in Eclipse:
- Maximizing Window (Double-Clicking): You lot can double-click on the "header" of any panel to maximize that particular panel, and double-click once again to restore it back. This characteristic is particularly useful for writing source code in full console.
- Shorthand Templates (sysout, for,...): You lot can type "
sysout" followed by a ctrl+infinite (or alt-/) as a shorthand for typing "System.out.println()".
The default shortcut central (ctrl-infinite or alt-/) depends on the system. Cheque your system's shortcut key setting in "Edit" ⇒ "Content Assist" ⇒ "Default". Take note that many of you utilize ctrl+infinite to switch between input languages. You need to reconfigure either your linguistic communication switching hot-central or Eclipse.
Similarly, you can type "for" followed by ctrl-space (or alt-/) to get a for-loop.
You tin create your ain shorthand in "Window" carte ⇒ "Preferences" ⇒ "Coffee" ⇒ "Editor" ⇒ "Templates". (Alternatively, in "Window" ⇒ "Preferences" ⇒ type "template" as filter text and cull "Java" ⇒ "Editor" ⇒ "Templates".)
Y'all can alter your central settings in "Window" card ⇒ "Preferences" ⇒ "Full general" ⇒ "Fundamental" ⇒ choose "Command", "Content Assist". (Alternatively, in "Window" ⇒ "Preferences" ⇒ type "key" equally filter text and choose "General" ⇒ "Key".) - Intelli-Sense (ctrl-space): You lot can use ctrl-space to actuate the "intelli-sense" (or content assistance). That is, Eclipse volition offer yous the choices, while yous are typing.
- Source Formatting (ctrl-shift-f): Correct-click on the source. Choose "Source" ⇒ "Format" to let Eclipse to layout your source codes with the proper indentation.
- Source Toggle Comment (ctrl-/): To comment/uncomment a block of codes, choose "Source" ⇒ "Toggle Comment".
- Hints for Correcting Syntax Error: If there is a syntax error on a argument, a red marking volition show up on the left-margin on that argument. You could click on the "lite bulb" to brandish the mistake message, and too select from the available hints for correcting that syntax mistake.
- Refactor (or Rename) (alt-shift-r): Yous can rename a variable, method, grade, packet or even the project easily in Eclipse. Select and correct-click on the entity to be renamed ⇒ "Refactor" ⇒ "Rename". Eclipse tin can rename all the occurrences of the entity.
- Line Numbers: To show the line numbers, choose "Window" menu ⇒ "Preferences" ⇒ "General" ⇒ "Editors" ⇒ "Text Editors" ⇒ Check the "Show Line Numbers" Box. Y'all can as well configure many editor options, such as the number of spaces for tab. Alternatively, you can right-click on the left-margin, and check "Bear witness Line Numbers".
- Error Message Hyperlink: Click on an error message will hyperlink to the corresponding source statement.
- Changing Font Type and Size: From "Window" menu ⇒ "Preferences" ⇒ "General" ⇒ "Appearance" ⇒ "Colors and Fonts" ⇒ expand "Java" ⇒ "Java Editor Text Font" ⇒ "Edit". (Alternatively, in "Window" ⇒ "Preferences" ⇒ blazon "font" as filter text and choose the appropriate entry.)
- Unicode Back up: To enable Unicode support, select "Window" carte du jour ⇒ Preferences ⇒ Full general ⇒ Workspace ⇒ Text file encoding ⇒ UTF-8. This sets the default graphic symbol set used for file encoding, similar to VM's command-line option
-Dfile.encoding=UTF-8. Ordinarily used charsets for Unicode are UTF-eight, UTF-16 (with BOM), UTF-16BE, UTF-16LE. Other charsets are U.s.a.-ASCII, ISO-8859-ane. - Mouse Hover-over: In debug style, you lot could configure to show the variable'due south value when the mouse hovers over the variable. Select "Window" bill of fare ⇒ "Preferences" ⇒ "Java" ⇒ "Editor" ⇒ "Hover".
- Comparing Ii Files: In "Package Explorer", select ii files (concord the command primal) ⇒ Right-click ⇒ Compare with ⇒ Each Other.
- Setting Keyboard Shortcut Keys: You tin can set/change the keyboard shortcut keys at "Window" ⇒ "Preferences" ⇒ "Full general" ⇒ "Primal".
I similar to set the frequently-used commands to Ctrl-1 to Ctrl-10, for examples, "Run Java Application" to "Ctrl-1", etc. - Useful Eclipse Shortcut Keys:
- F3: Goto the declaration of the highlighted variable/method.
- Ctrl-Shift-G: Search for ALL references of the highlighted variable/method in workspace.
- Ctrl-One thousand: Search for the Declaration of a variable/method in workspace.
Don't employ Find (Ctrl-F), but use the higher up context-sensitive search. - Ctrl-Shift-F: Format the source code.
- Ctrl-Shift-O: Organize imports.
- Alt-Shift-R: Rename. (Don't use Find/Replace.)
- Ctrl-Infinite: auto-complete.
- Bundle Explorer vs. Navigator: We ordinarily employ "Package Explorer" in programming, but it will not show you lot all the folders and files under the project. On the other manus, "Navigator" is a file manager that shows the verbal file construction of the projection (similar to Windows Explorer). Y'all can enable the Navigator past "Window" ⇒ Show view ⇒ Navigator.
- Spell Check: To enable spell check, select Window ⇒ Preferences ⇒ blazon "spell" in the filter ⇒ General ⇒ Editors ⇒ Text Editors ⇒ Spelling ⇒ Check "Enable spell checking". Likewise provide a "User defined dictionary" (with an initially empty text file).
To right mis-spell words, right-click and printing ctrl-ane (or Edit card ⇒ Quick Set). - Eclipse's Log File: Goto Help ⇒ nigh Eclipse ⇒ Installation details ⇒ Configuration ⇒ View Error Log.
- Viewing two files in separate screen: Only click and hold on the title of one file and drag it to the editor screen. You can separate horizontally or vertically by varying the drag target.
To view the Same file on dissever screen, create a new editor window past selecting Window ⇒ New Editor; and drag one window to the lower side of the screen. Alternatively, select Window ⇒ Editor ⇒ Toggle Split Editor (Horizontal) or Toggle Split Editor (Vertical). - Block Select (Column Select): Push Alt-Shift-A to toggle betwixt cake-select way and normal way.
- Snippets:
- To view the snippet window: choose "Window" ⇒ Show View ⇒ Snippets.
- To create a new snippet category: Correct-click ⇒ Customize ⇒ New.
- To create a new snippet item: Re-create the desired text ⇒ Select the snippet category ⇒ paste as snippet.
- To insert a snippet: place the cursor on the desired location at the editor panel ⇒ click the snippet detail.
- Discussion Wrap (Line Wrap): Discussion-wrap (or line-wrap) is essential for editing long HTML documents without the horizontal roll bar. All the same, the Eclipse's HTML Editor and Text Editor practice not support word-wrap.
You could install a plug-in chosen "Word Wrap" from http://ahtik.com/eclipse-update/.
Choose "Assist" ⇒ Install New Software ⇒ in "Work with" Enter "http://ahtik.com/eclipse-update/".
To actuate give-and-take wrap, right-click on the editor panel ⇒ select "Discussion Wrap". - Creating "link folder" in projection: Yous do not have to place all the folders nether the project base directory, instead, you lot can utilise so-chosen "link folders" to link to folder outside the project base directory.
To create a link folder in a project, correct-click on the projection ⇒ File ⇒ New ⇒ Folder ⇒ Advanced ⇒ Check Link to alternate Location (Linked Folder). - Running Eclipse in "clean" manner: You can run eclipse in so-called "
make clean" mode, which wipes all the cached data and re-initialize the cache, by running eclipse from command-line with "-clean" argument (i.east., "eclipse -clean"). It is useful if something is not working proper, especially if you install a new copy of Eclipse. - Show the Right Margin: Window ⇒ Preferences ⇒ General ⇒ Editors ⇒ Text Editors ⇒ Prove Print Margin and set up the cavalcade number.
- Zoom in/out (ctrl++ or ctrl+-)
- Allow me know if you take more than tips to be included here.
Update Eclipse and Install new Software
- Install New Software: Select "Aid" carte du jour ⇒ Install New Software ⇒ In "Work With", pull down the select carte du jour and choose a software site.
- Update: Select "Aid" menu ⇒ Bank check for Updates.
For Coffee Application Development Only
- Pocket-size Toy Java Programs: Y'all can go on many small-scale programs (with
principal()) in one Java project instead of create a new projection for each toy plan. To run the desired plan, correct-click on the source file ⇒ "Run as" ⇒ "Coffee Awarding". - Scanner/printf() and JDK i.5: If you encounter syntax mistake in using
printf()orScanner(which are bachelor from JDK 1.5), you lot need to check your compiler settings. Select "Window" menu ⇒ Preferences ⇒ open the "Java" node ⇒ select "Compiler" ⇒ in "Compiler compliance level" ⇒ select the latest release, which should be "1.5" or above. - Command-Line Arguments: To provide command-line arguments to your Coffee programme in Eclipse, right-click on the source file ⇒ "Run Configurations" ⇒ Under the "Master" panel, check that "Projection" name and "Main Form" are advisable ⇒ Select the "Statement" tab ⇒ type your command-line arguments inside the "Program Arguments" box ⇒ "Run".
- Resolving Import (Ctrl-Shift-o): To inquire Eclipse to insert the
importstatements for classes. Useful when you lot copy a large chunk of codes without the corresponding import statements. - Including Some other Project: To include some other project in the same work space, right-click on the projection ⇒ Build Path ⇒ Configure Build Path... ⇒ Select "Projects" tab ⇒ "Add..." to select project in the existing work infinite ⇒ OK.
- Exporting a Project to a JAR file: Right-click on the project ⇒ Export... ⇒ Java, JAR File ⇒ Next ⇒ Select the files to be exported ⇒ Next ⇒ Side by side ⇒ In "JAR Manifest Specification" dialog, enter the chief class (if you wish to run the JAR file direct) ⇒ Finish.
- Unit of measurement Testing: If y'all keep your test in another project, you need to include the projection nether test in your Build Path (see above).
To create a test example: Right-click on the projection ⇒ New ⇒ JUnit Test Case ⇒ the "New JUnit Test Example" dialog appears. Select "New JUnit 4 Exam". In "Name", enter your class name. In "Form under examination", browse and select the class to be tested.
To run the test: Right-click ⇒ "Run As" ⇒ "JUnit Test". The results are displayed in a special "JUnit console". - Calculation External JAR files & Native Libraries (".dll", ".lib", ".a", ".and so"): Many external Java packages (such as JOGL, Java3D, JAMA, etc) are available to extend the functions of JDK. These packages typically provide a "
lib" directory containing JAR files (".jar") (Java Archive - a single-file parcel of Java classes) and native libraries (".dll", ".lib" for windows, ".a", ".and then" for Linux and macOS).
To include these external packages into an Eclipse's project, right-click on the projection ⇒ Build Path ⇒ Add External Archives ⇒ Navigate to select the JAR files (".jar") to be included.
In "Package Explorer", correct-click on the JAR file added ⇒ Properties:- To include native libraries ("
.dll", ".lib", ".a", ".so"), select "Native Library" ⇒ "Location Path" ⇒ "External Folder". - To include the javadoc, select "JavaDoc Location" ⇒ "JavaDoc URL" ⇒ You can specify a local file or a remote link.
- To include source file (for debugging), select "Java Source Zipper".
Notes: The JAR files must be included in theCLASSPATH. The native library directories must be included in JRE'southward property "coffee.library.path", which normally but not necessarily includes all the paths from thePATHenvironment variable. Read "External JAR files and Native Libraries". - To include native libraries ("
- Creating a User Library: Yous tin likewise create a Eclipse'south user library to include a prepare of JAR files and native libraries, that tin can then be added into subsequent Eclipse projects.
For case, I created a user library for "JOGL" every bit follows:
- From "Window" menu ⇒ Preferences ⇒ Coffee ⇒ Build Path ⇒ User Libraries ⇒ New ⇒ In "User library proper name", enter "
jogl". The "User Library" dialog appears. - In "User Library" dialog ⇒ Select "
jogl" ⇒ Add JAR... ⇒ Navigate to<JOGL_HOME>/lib, and select "gluegen-rt.jar" and "jogl.jar". - Expand the "
jogl.jar" node ⇒ Select "Native library location: (none)" ⇒ Edit... ⇒ External Folder... ⇒ select<JOGL_HOME>/lib. - Expand the "
jogl.jar" node ⇒ Select "Javadoc location: (none)"⇒ Edit... ⇒ Javadoc in annal ⇒ In "Archive Path", "Scan" and select the downloaded JOGL API documentation zip-file ⇒ In "Path within annal", "Browse" and expand the nada-file to select the top-level path (if any) ⇒ Validate. Alternatively, you can provide the path to the un-zipped javadocs. This is needed for Eclipse to brandish javadoc information well-nigh classes, fields, and methods. - You may provide the source files by editing "Source attachment: (none)". Source is needed only if y'all are interested to debug into the JOGL source codes.
jogl". - From "Window" menu ⇒ Preferences ⇒ Coffee ⇒ Build Path ⇒ User Libraries ⇒ New ⇒ In "User library proper name", enter "
- Running an External Program: Suppose that you want to run a Perl script on the selected file, you can configure an external tool equally follows:
- From "Run" card ⇒ External Tools ⇒ External Tools Configuration... ⇒ The "External Tools Configuration" dialog appears.
- In "Proper name", enter your tool proper name.
- Choose the "Main" tab ⇒ In "Location", "Browse File Organization..." to cull the perl interpreter "perl" ⇒ In "Arguments", enter "
path/scriptname.pl ${resource_loc}", where${resource_loc}is an Eclipse variable that denotes the currently selected resource with absolute path. - Choose the "Common" tab ⇒ In "Standard Input and Output", uncheck "Allocate Console", check "File" and provide an output file (e.g.,
d:\temp\${resource_name}.txt). - (If you use the CYGWIN perl interpreter, demand to gear up environs variable CYGWIN=nodosfilewarning to disable alert message.)
- Viewing Hex Lawmaking of Primitive Variables in Debug fashion: In debug perspective, "Variable" panel ⇒ Select the "menu" (inverted triangle) ⇒ Java ⇒ Coffee Preferences... ⇒ Primitive Display Options ⇒ Check "Display hexadecimal values (byte, short, char, int, long)".
- Adding a New Version of JDK/JRE: First, you lot tin can cheque the installed JDK/JRE via "Window" menu ⇒ "Preferences" ⇒ Expand "Java" node ⇒ "Installed JREs". Check the "Location" electric current JRE installed to make certain that it is the intended one. Yous can utilise the "Add" button to add a new version of JRE. For plan evolution, I recommend that yous add the JDK (instead of JRE). [The "Location" decides the extension directory used for including boosted JAR files, due east.g.,
$JAVA_HOME\jre\lib\ext.] - To highlight matching variables: Select Window ⇒ Preferences ⇒ Java ⇒ Editor ⇒ Mark Occurrences.
For Web Developers
- HTML Editor: Employ the "Web Page Editor" (bachelor in Eclipse Coffee EE), which provides the blueprint view (WYSISYG).
To use the "Web Page Editor", correct-click on the HTML file, open as "Web Page Editor".
To make the "Web Page Editor" as default for HTML file, goto Window ⇒ Preferenes ⇒ General ⇒ Editor ⇒ File Associations ⇒ .htm and .html ⇒ Select "Spider web folio editor" ⇒ default.
File I/O in Eclipse
The question always is: where to place the files or external resources?
The following program create and write to a text file "out.txt" (via java.util.Formatter), and read it back (via java.util.Scanner). I do the write first then that you can cheque the location of the exteranl files under eclipse, which is at the project base of operations directory, at the same level as the "src" and "bin".
1 2 3 4 5 6 seven 8 9 10 eleven 12 xiii 14 15 16 17 xviii 19 20 21 22 23 24 25 26 27 28 29 | import java.util.Scanner; import coffee.util.Formatter; import java.io.File; import java.io.FileNotFoundException; public grade TestFileIO { public static void main (String [] args) { try { Formatter out = new Formatter(new File("out.txt")); out.format("%d %f %south%due north", 1234, 55.66, "hello"); out.close(); } catch (FileNotFoundException e) { e.printStackTrace(); } try { Scanner in = new Scanner(new File("out.txt")); int i = in.nextInt(); double d = in.nextDouble(); String s = in.side by side(); in.close(); System.out.printf("%d %f %s%n", i, d, s); } catch (FileNotFoundException e) { due east.printStackTrace(); } } } |
Notes:
- You can create you lot input file from eclipse straight via "File" menu ⇒ "New" ⇒ "File" or "Text File".
- You may need to right-click the project and select "Refresh" to run across the output file created in the parcel explorer.
- Remember to add a newline to the finish of your input file.
Using URL to Read Audio and Paradigm Files
If you utilise the URL to read an sound or Image files, then place the files under "src" (instead of the project base of operations directory), which will be copied into the "bin" directory.
URL url = this.getClass().getClassLoader().getResource(filename);
Writing Swing Applications using Eclipse GUI Builder
Eclipse provides a visual GUI architect called "WindowBuilder" (@ https://www.eclipse.org/windowbuilder), which supports AWT/Swing, SWT (Eclipse's Standard Widget Toolkit - an alternative to JDK's AWT/Swing), XWT, GWT, eRCT.
Pace 0: Install WindowBuilder
To install "WindowBuilder", goto "Assist" ⇒ Install New Software ⇒ In "Work with", enter "https://download.eclipse.org/windowbuilder/latest/" (You lot can find the proper link from "http://www.eclipse.org/windowbuilder/download.php") ⇒ Check "WindowBuilder" ⇒ Adjacent ⇒ Next ⇒ Accept the licence ⇒ Finish.
Stride 1: Create a New "Java Application" Project
- Cull "File" menu ⇒ "New" ⇒ "Java projection".
- The "New Java Projection" dialog pops upward.
- In the "Project name" field, enter "
FirstSwingProject". - Check "Use default location".
- In the "JRE" box, select "Utilise default JRE (currently 'JDK1.x')".
- Click "End".
- In the "Project name" field, enter "
Footstep two: Create a Swing JFrame Bracket
- Cull "File" carte du jour ⇒ "New" ⇒ "Others" ⇒ "WindowBuilder" ⇒ "Swing Designer" ⇒ "JFrame" ⇒ "Next".
- In the "Create JFrame" dialog ⇒ Enter "SwingMain" in the "Name" field ⇒ "Finish".
- Select the "Design" pane.
- In "Layouts", select "FlowLayout" and click on the "design grade".
- From "Components", select "
JLabel" and click on the pattern grade. Change the label text to "Counter: ". Select a "JTextField" and identify it on the design form. Change the text to "0". Select a "JButton" and place it on the design grade. Alter the text label to "Count". - To attach a event-handler to the button, double-click the
JButtonto switch into the "Source" pane, with the event-handler skeleton created. Complete theactionPerformed()equally follows:public void actionPerformed(ActionEvent east) { count++; textField.setText(count + ""); }Add together an instance variable chosencountas follow:public class SwingMain extends JFrame { private int count = 0; ...... - You lot can now set up run the program. Right-click on the project ⇒ Run Every bit ⇒ Java Application.
Eclipse Generated Codes
Study the codes generated by Eclipse GUI Builder, every bit follows, which is just a typical Swing application.
1 2 3 4 5 six seven 8 nine 10 xi 12 xiii 14 15 16 17 eighteen 19 20 21 22 23 24 25 26 27 28 29 30 31 32 33 34 35 36 37 38 39 40 41 42 43 44 45 46 47 48 49 50 51 52 53 54 55 56 57 58 59 | import coffee.awt.*; import java.awt.event.*; import javax.swing.*; import javax.swing.border.EmptyBorder; public class SwingMain extends JFrame { private JPanel contentPane; private JTextField textField; private int count = 0; public static void main(String[] args) { EventQueue.invokeLater(new Runnable() { @Override public void run() { try { SwingMain frame = new SwingMain(); frame.setVisible(true); } catch (Exception e) { east.printStackTrace(); } } }); } public SwingMain() { setDefaultCloseOperation(JFrame.EXIT_ON_CLOSE); setBounds(100, 100, 450, 300); contentPane = new JPanel(); contentPane.setBorder(new EmptyBorder(5, 5, five, 5)); setContentPane(contentPane); contentPane.setLayout(new FlowLayout(FlowLayout.Middle, five, five)); JLabel lblNewLabel = new JLabel("Counter: "); contentPane.add(lblNewLabel); textField = new JTextField(); textField.setText("0"); contentPane.add together(textField); textField.setColumns(10); JButton btnCount = new JButton("Count"); btnCount.addActionListener(new ActionListener() { @Override public void actionPerformed(ActionEvent e) { count++; textField.setText(count + ""); } }); contentPane.add(btnCount); } } |
Eclipse for C/C++ Programming
Here.
Eclipse PDT (PHP Development Tool)
Here.
Eclipse-JavaEE and Database Development
Reference: "Information Tools Platform User Documentation" @ Eclipse Welcome page.
You need to install:
- "Eclipse for Java EE" (aka "Eclipse IDE for Enterprise Java Developers").
- "MySQL Customs Server" and "MySQL Connector/J Driver". Read "How to install and become started with MySQL".
To use Eclipse for MySQL development:
- Switch to "Database Development" perspective:
From "Window" card ⇒ Open up Perspective ⇒ Other ⇒ Database Evolution. - Create a Database Connectedness: Offset your MySQL database server ⇒ Right-click "Database Connection" ⇒ New. Accept note that each database connection connect to ONE particular database in the database server with a URL in the form of jdbc:mysql://localhost:3306/database-name.
- In "Connection Profile", cull "MySQL" ⇒ Next.
- In "Drivers", click the icon for "New Commuter Definition" (if the driver has not been defined).
- In "Specify a Driver Template and Definition Proper noun":
- Choose the "Proper noun/Blazon" tab ⇒ Choose one of the database driver equally our template (east.g. MySQL v.ane) for further customization ⇒ Set your "Driver name", eastward.one thousand., "mysql-connector-java-8.0.23".
- Switch to "JAR List" tab ⇒ Articulate All ⇒ Click "Add JAR/Null" and select the driver JAR file, east.thousand., mysql-connector-java-8.0.23.jar.
- Switch to "Backdrop" tab ⇒ Check the parameters.
- OK.
- Enter the "Database" name, URL (with the same database name), and the "Countersign" ⇒ Click "Test Connection"
- Finish.
- In "Datasource Explorer", yous tin "connect" and "disconnect" the connection.
- To view and edit tabular array visually, expand database "Schemas" to look for the tabular array. Right-correct on the table ⇒ Data ⇒ Edit. Y'all can modify the cells and "save" the changes.
- To create a new SQL script, choose File ⇒ New ⇒ SQL File ⇒ You may use an existing project or create a new project (General|Project or Spider web|Dynamic Web Project) ⇒ Enter filename, and set up the connection profile proper noun ⇒ Finish. Enter a SQL statement (e.g., SELECT * FROM tablename) ⇒ Right-click on the text ⇒ "Execute Current Text" or "Execute All".
- To use an existing SQL file, drib the file into a projection and open up the SQL file. In Connexion contour, fix the type and connectedness name. Right-click on a argument ⇒ "Execute ...".
Developing and Deploying Webapps in Eclipse-JavaEE
Setting Up Eclipse-JavaEE for Web Development
- Install "Eclipse for Coffee EE" (aka "Eclipse IDE for Enterprise Java Developers").
- Install Tomcat (or Glassfish) server.
- Configuring Web Server: Launch Eclipse ⇒ Window ⇒ Preferences ⇒ Expand the "Server" node ⇒ "Runtime Environments" ⇒ "Add..." ⇒ Aggrandize "Apache" and select "Apache Tomcat vX.10" ⇒ Enter your "Tomcat Installation Directory" ⇒ "Stop".
Writing a Howdy-world Servlet
- Switch to "Coffee EE" perspective (which is the default perspective for Eclispe-JavaEE):
From "Window" carte ⇒ Open up Perspective ⇒ Other ⇒ Java EE. - Create a new Spider web Awarding Project: from "File" ⇒ New ⇒ Dynamic Spider web Projection (under "Web" category) ⇒ In "Project Name", enter "
HelloServletProject" ⇒ "Stop". - Create a new Servlet: Correct-click on the project "
HelloServletProject" ⇒ New ⇒ Servlet ⇒ In "Coffee Package", enter "mypkg"; in "Form Proper name", enter "HelloServlet" ⇒ Next ⇒ In "URL Mappings", select "/HelloServlet" ⇒ "Edit" to "/sayhello" ⇒ Adjacent ⇒ In "Which method stubs would you similar to create", check "Inherited abstract method", "doGet" and "doPost" (default) ⇒ Finish.
In "HelloServlet.java", enter the post-obit codes:parcel mypkg; import java.io.IOException; import coffee.io.PrintWriter; import javax.servlet.ServletException; import javax.servlet.note.WebServlet; import javax.servlet.http.HttpServlet; import javax.servlet.http.HttpServletRequest; import javax.servlet.http.HttpServletResponse; @WebServlet("/sayhello") public grade HelloServlet extends HttpServlet { private static final long serialVersionUID = 1L; public HelloServlet() { super(); } protected void doGet(HttpServletRequest request, HttpServletResponse response) throws ServletException, IOException { response.setContentType("text/html"); PrintWriter out = response.getWriter(); out.println("<!DOCTYPE html>"); out.println("<html>"); out.println("<head><title>Hello Servlet</championship></head>"); out.println("<torso>"); out.println("<h1>Hello World, from Servlet!</h1>"); out.println("<p>Method: " + request.getMethod() + "</p>"); out.println("<p>Request URI: " + asking.getRequestURI() + "</p>"); out.println("<p>Protocol: " + request.getProtocol() + "</p>"); out.println("<p>PathInfo: " + request.getPathInfo() + "</p>"); out.println("<p>Remote Address: " + request.getRemoteAddr() + "</p>"); out.println("<p>Generate a Random Number per request: <strong>" + Math.random() + "</strong></p>"); out.println("</body>"); out.println("</html>"); } protected void doPost(HttpServletRequest request, HttpServletResponse response) throws ServletException, IOException { doGet(asking, response); } }(For Servlet ii.4/2.5 with Tomcat 6) The notation
@WebServletis new in Servlet 3.0 and is not supported in Servlet 2.4/2.5. Hence, you lot demand to manually configure the URL for the servlet in the Web Application Deployment Descriptor "web.xml" nether directory "Web-INF", every bit follows:<?xml version="1.0" encoding="ISO-8859-1"?> <web-app xmlns="http://java.sun.com/xml/ns/javaee" xmlns:xsi="http://www.w3.org/2001/XMLSchema-instance" xsi:schemaLocation="http://java.sun.com/xml/ns/javaee http://java.sun.com/xml/ns/javaee/web-app_3_0.xsd" version="3.0" metadata-complete="true"> <servlet> <servlet-proper noun>HelloServletExample</servlet-name> <servlet-class>mypkg.HelloServlet</servlet-class> </servlet> <servlet-mapping> <servlet-proper name>HelloServletExample</servlet-name> <url-pattern>/sayhello</url-design> </servlet-mapping> </spider web-app>
- To execute the Servlet, right-click on the "
HelloServletProject" ⇒ "Run As" ⇒ "Run on Server" ⇒ Alter the URL to "http://localhost:8080/HelloServletProject/sayhello".
Writing a Hello-world JSP (Java Server Pages)
- Create a new Web Application: File ⇒ New ⇒ Dynamic Spider web Project (under "Web" category) ⇒ In "Projection Name", enter "
HelloJSPProject" ⇒ Cease. - Create a new JSP File: Correct-click on the projection "
HelloJSPProject" ⇒ New ⇒ JSP File ⇒ The parent folder shall be "HelloJSPProject/WebContent" ⇒ In "File Name", enter "hello.jsp" ⇒ "Stop". - Enter the following HTML/JSP codes:
<%@ page linguistic communication="java" contentType="text/html; charset=ISO-8859-one" pageEncoding="ISO-8859-ane"%> <!DOCTYPE html> <html> <head> <meta charset="ISO-8859-1"> <championship>Hello JSP</championship> </head> <trunk> <h1>Hello World, from JSP</h1> <p>Method: <%= request.getMethod() %></p> <p>Asking URI: <%= request.getRequestURI() %></p> <p>Protocol: <%= asking.getProtocol() %></p> <p>PathInfo: <%= request.getPathInfo() %></p> <p>Remote Address: <%= request.getRemoteAddr() %></p> <% double num = Math.random(); if (num > 0.75) { %> <h2>You'll have a lucky mean solar day!</h2><p>(<%= num %>)</p> <% } else { %> <h2>Well, life goes on ... </h2><p>(<%= num %>)</p> <% } %> <h3><a href="<%= request.getRequestURI() %>">Endeavour Once more</a></h3> </body> </html>
- To execute the JSP, right-click on "
hi.jsp" ⇒ Run Every bit ⇒ Run on Server.
Exporting a Webapp every bit a State of war file
Right-click on the project to exist exported ⇒ Export ⇒ War File ⇒ In "Destination", specify the destination directory and filename (the filename shall be the web awarding proper name) ⇒ Terminate.
- To deploy the war file in Tomcat, but drop the war file into Tomcat's "
webapps" binder. The war file will be automatically extracted and deployed. The web application name is the war-filename. - You could use WinZip (or WinRAR) to view the content of the war file, as state of war-file is in Zippo format.
Deploying a webapp outside the Tomcat's webapps directory
To deploy a webapp (called hello) outside the %TOMCAT_HOME%\webapps directory, create a howdy.xml file as follows and place information technology nether the %TOMCAT_HOME%\conf\Catalina\localhost:
<Context displayName="hello" docBase="C:\path\to\webapp" path="/hello" reloadable="true" />
Writing a Hullo-world JSF (JavaServer Faces)
[TODO]
Debugging Webapps
Yous tin can debug a webapp only like standalone application. For example, you can set breakpoints, unmarried-step through the programs, etc.
REFERENCES & RESOURCES
- Eclipse mother site @ https://www.eclipse.org.
- Eclipse documentation and user guides, attainable via Eclipse's Help and menu.
Latest version tested: Eclipse Coffee and Eclipse JavaEE 2021-12
Last modified: January 2022
Source: https://www3.ntu.edu.sg/home/ehchua/programming/howto/eclipsejava_howto.html
Posted by: lasalleflar1946.blogspot.com
0 Response to "How To Install Java Eclipse On Windows 10"
Post a Comment